Blogs about glass-art
Art Show Notes.
9.7.2014
I recently un-installed my second art show, and I wanted to share some of my learnings and thoughts from it. These art shows are monthly rotating displays of art made by Getty Images employees; not the professional photographers (though there are several regular folks who have photography hobbies at Getty). For my second show, I was invited to put up work from my recent "Screenprinting on Glass" class, which I take at Pratt Fine Arts in Seattle.
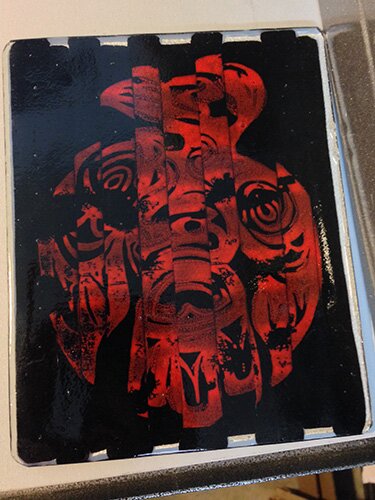
 This is a Native American style raven image, screenprinted with red enamel onto black glass. I didn't like the results when it first came out of the kiln, so I cut the glass into strips and staggered them a bit before capping it with clear glass and re-firing. The second firing did a much better job of demonstrating the flexibility of glass. After the piece was up for about a week, a colleague bought this piece - hurray!
Art Show Tips:
- If it's for sale, just put the price right out there. Don't make interested buyers ask, or let them think "if I have to ask about the price, it's too expensive". Unless you put bright yellow pricing-gun stickers all over, pricing information isn't going to offend anyone.
- Flat glass art such as the above is amazing as it is. It doesn't need framing to stand out - and doing so will just cover up the inherent coolness of the media. If possible, build hanging or stand-up affordances right into the piece.
- Post a brief biography of yourself and your "artist's statement" as well as a description of the process for your art. This will give even shy visitors some information about why your pieces are interesting.
- I don't have an Etsy site (well I do, but I don't keep it up-to-date). But if I did, I would have printed up some takeaway cards on Moo to point people to the Etsy site.
Easter Egg Paperweight.
2.22.2014
 I made this paperweight during an April Blow Your Own event at Art By Fire in 2010. If you've ever wanted to try glassblowing, a quick "blow your own" or mini-class is a great way to test the waters: a professional will walk you through the entire creation of your own "shape of the month" in about 15 minutes. The next day or so, after it's cooled down, you get to take your new glass artwork home!
My goal with this piece was to put a lot of bubbles into it, and I still love the effect. The egg-like shape of the piece was done with an oval shaped block, as opposed to the more common round blocks.
As always, thanks to the husband for the photography.
Poxy Bowl, ca 2010.
11.6.2013
I made this bowl during a May 2010 class at Seattle Glassblowing Studio during a Beginner's II class. To this day, bowls remain one of my favorite forms to make.
 The pink spots are "ghetto murrini" - cane cut into discs and then warmed on a kiln shelf until they're hot enough to pick up with the bubble of the bowl. The white is a standard lip wrap that didn't quite get hot enough and came on thick and blobby.
This technique is worth experimenting with again, and the pink and white color combination is always classy. As always, thanks to the husband for the photography.
The Perfect S'more.
9.24.2013
The perfect s'more is a subjective thing, but mine has a golden brown (but not burnt) marshmallow that's warm enough to melt the chocolate. Recently, I had an opportunity to do some good old-fashioned s'more making, and I noticed how similar s'more roasting is to glassblowing. Here are my tips for making a perfect s'more:
- Prepare your graham cracker and chocolate before working on the marshmallow (mise en place - it matters) - you won't have any time once the marshmallow is done. As a bonus, setting your chocolate by the fire will warm it up a little.
- Select the right spot in the fire. You want an largish enclosed area of hot coals (not flames); if your heating area is too small, the heat will be too intense. Ideally, find a place where you can apply heat at the back end of the marshmallow (near the stick) - which wouldn't otherwise get heated well.
- Rotate that marshmallow slowly and evenly. A straight stick helps. If you're lucky, you can rest the end of your stick on a log or rock to steady your turning.
- Keep your eyes on that marshmallow. When it gets all floppy, you know the inside is good and soft. Only when that happens should you pull it out of the fire and assemble your s'more.
Mothers' Day Paperweight.
5.16.2013
I made this paperweight during an Art By Fire Blow Your Own event in April of 2010. The colored core was (probably) made from shards of a failed piece at Art By Fire, which were preheated in a small kiln. I picked that up on a bitrod, and did a few rounds of shape and encase to create the final form.
 My favorite part of this piece is all of the bubbles; created by leaving divots instead of a smooth surface when dipping into the furnace for another layer of glass. There is a particularly lovely streak of teeny bubbles, and one large bubble in the center.
More blogs about glass-art:
-
Icicle. — 7.8.2012
-
Olympic Color Rods. — 6.2.2012
-
Glassblowing Tools. — 3.20.2012
-
Fused Glass at Glassique. — 2.29.2012
-
Intro to Fused Glass. — 1.4.2012
-
Blue Glass Pumpkin. — 10.31.2011
-
Brown Glass Pumpkin. — 10.10.2011
-
Purple Glass Pumpkin. — 9.26.2011
-
Christmas Sucky Bowl. — 9.6.2011
-
Cube Glass Paperweight. — 6.19.2011
-
World's Fanciest Butter Dish. — 4.11.2011
-
Tax Tips. — 3.30.2011
-
Mr. Ugly. — 3.9.2011
-
Potion Vase. — 1.17.2011
-
The Perfect Glass Pumpkin. — 10.25.2010
-
Applejack Daisy Tumbler. — 8.19.2010
-
Glass Pumpkin 2009 #3. — 7.18.2010
-
A Day In the Life of Dale Chihuly. — 7.12.2010
-
Glass Bud Vase. — 6.21.2010
-
Fluted Bowl with a Two Color Optic Twist. — 6.3.2010
-
Glass Pumpkin 2009 #2. — 4.29.2010
-
Two Tone Flower Glass Paperweight. — 3.31.2010
-
Glass Cactus Pumpkins. — 2.21.2010
-
Gaming For The Win. — 2.4.2010
-
Phoenix Mix Ornament. — 1.25.2010
-
New Glassblowing Shop. — 11.14.2009
-
Glass Work - First Half of 2009. — 10.27.2009
-
Nothing Lasts Forever. — 8.12.2009
-
Glass Sculpture. — 7.12.2009
-
My Globby Glass. — 6.24.2009
-
A New Hobby. — 5.24.2009
 This is a Native American style raven image, screenprinted with red enamel onto black glass. I didn't like the results when it first came out of the kiln, so I cut the glass into strips and staggered them a bit before capping it with clear glass and re-firing. The second firing did a much better job of demonstrating the flexibility of glass. After the piece was up for about a week, a colleague bought this piece - hurray!
 The pink spots are "ghetto murrini" - cane cut into discs and then warmed on a kiln shelf until they're hot enough to pick up with the bubble of the bowl. The white is a standard lip wrap that didn't quite get hot enough and came on thick and blobby.
 My favorite part of this piece is all of the bubbles; created by leaving divots instead of a smooth surface when dipping into the furnace for another layer of glass. There is a particularly lovely streak of teeny bubbles, and one large bubble in the center.


