Pictures
Alt.Swag for Conferences.
3.30.2015
 At this point, most developers already have more t-shirts than they can possibly wear. So if you're organizing a conference - or a sponsor looking to stand out - consider some alternate ideas for conference swag:
- Stickers! (Everyone)
-
Developers love stickers, and they're relatively cheap. Just be sure to get fairly sturdy stickers that won't fall apart after living on a laptop or notebook for a few months.
Sources: Sticker Mule.
- Water bottles (CascadiaJS)
-
Save the environment by providing nice refillable bottles instead of disposable water bottles.
Sources: Mizu, US Imprints
- Notebooks (Nodevember)
-
It's a bit old-fashioned, but I still prefer to take notes on good old paper. I can freeform the notes without worrying about formatting, and I don't get distracted as when I'm on the computer. Notebooks are also a great place for all those stickers!
Sources: Chameleon Like, Bound Custom Journals, Poppin, Field Notes.
- Pens!
-
How else am I going to write the notes?
- Swag bag (CascadiaJS, SassConf, Nodevember)
-
Everyone loves a nice sturdy bag to hold all of the stuff they accumulate at a conference. Also these are great for re-use at home or later during the conference trip.
- USB Battery (Nodevember)
-
A their booth, one of the Nodevember sponsors was giving away a very handy rechargeable USB stick.
Sources: Branders, 4 Imprint, Print Globe.
- Taster glasses (Nodevember)
-
I got a lovely little taster glass from the closing Nodevember party. They also have mustache-shaped bottle openers, if that's your thing.
Sources: Clear Water Gear, Discount Mugs, Yankee Schooner
- Hoodies! (CascadiaJS, SassConf)
-
A very cool item. They're fairly expensive, especially the CascadiaJS ones with the customized sleeves. But this can be a special item for speakers, or super-early ticket buyers.
- Earbuds
-
I got some branded earbuds from a conference, but sadly none of the silicon tips fit my ears.
- Books! (SassConf)
-
Many a publisher can be talked into providing a few copies of a book as a give away. And O'Reilly will give free e-books to communities.
(The above photo was taken before CSSConf AU, but I really dig the enameled coffee mug, sturdy shopping bag, and custom lapel pin that they gave out!)
Marvel Dice Masters Constructed Deck Review - January 2015.
1.6.2015
 I went to a constructed deck tournament for Marvel Dice Masters this weekend. I had fun, but didn't expect to lose so much. Here is a review of the cards I brought, and how effective they were in play.
- Ant-Man - Biophysicist (UXM): It's always great to have a 2 energy cost character for the first few rounds, but I think a Beast or Storm might be a Constructed format where players have control of the dice distribution.
- Storm - African Priestess (AVX): Very effective. Load this card up with all 4 dice next time.
- Kitty Pryde - Sprite (UXM): Kitty wasn't as effective as I needed at a cost of 3 energy. Perhaps I'll try her 2 cost card next time.
- Nightcrawler - Circus Freak (AVX): I didn't buy any Nightcrawlers during the matches, because every time I had 4 fist energy, I wanted a Wolvie. I want to play with Kurt, so I will just have to suck it up and try him next time.
- Wolverine - Formerly Weapon Ten (AVX): This Wolvie works great - especially if you can clear all the blockers. Thrown Car's spillover damage helps.
- Black Panther - Wakanda Chief (USM): He would have worked well (Thrown Car counters his "opponents must have fielded characters" limitation), but as another 4 fist energy character, I didn't get him out enough.
- Captain America - Star Spangled Avenger (AVX): This was a very effective card, but difficult to buy since I didn't have any lower-cost Shield type characters.
- Cable - Techno-Organic (UXM): As with Cap, Cable was effective at clearing small blockers, but tricky to buy.
- Thrown Car (AVX): One of the more expensive actions, especially with Wolverine and Black Panther available, but this action always leads to damage.
- Focus Power (AVX): A cheaper action that's almost always useful.
Brussels Sprout Casserole
11.28.2014
 Try this Brussels sprout casserole recipe to turn around the Brussels sprouts hater in your household. Roasting the sprouts on a preheated sheet pan ensure that they get cooked through and dark and delicious on the outside. Bringing bacon and cream to the party ensures a lovable dish. Being able to make most of this dish ahead makes it great for avoiding the oven-contention on holidays, though you could certainly make it all at one go.
Raven
9.7.2014
 This is a Native American style raven image, screenprinted with red enamel onto black glass. I didn't like the results when it first came out of the kiln, so I cut the glass into strips and staggered them a bit before capping it with clear glass and re-firing. The second firing did a much better job of demonstrating the flexibility of glass.
This piece was part of Getty Images' employee art show, and has been sold to a private party.
Easter Egg Paperweight.
2.22.2014
 I made this paperweight during an April Blow Your Own event at Art By Fire in 2010. If you've ever wanted to try glassblowing, a quick "blow your own" or mini-class is a great way to test the waters: a professional will walk you through the entire creation of your own "shape of the month" in about 15 minutes. The next day or so, after it's cooled down, you get to take your new glass artwork home!
My goal with this piece was to put a lot of bubbles into it, and I still love the effect. The egg-like shape of the piece was done with an oval shaped block, as opposed to the more common round blocks.
As always, thanks to the husband for the photography.
Poxy Bowl, ca 2010
11.6.2013
I made this bowl during a May 2010 class at Seattle Glassblowing Studio during a Beginner's II class. To this day, bowls remain one of my favorite forms to make.
 The pink spots are "ghetto murrini" - cane cut into discs and then warmed on a kiln shelf until they're hot enough to pick up with the bubble of the bowl. The white is a standard lip wrap that didn't quite get hot enough and came on thick and blobby.
This technique is worth experimenting with again, and the pink and white color combination is always classy.
As always, thanks to the husband for the photography.
Mothers' Day Paperweight.
5.16.2013
I made this paperweight during an Art By Fire Blow Your Own event in April of 2010. The colored core was (probably) made from shards of a failed piece at Art By Fire, which were preheated in a small kiln. I picked that up on a bitrod, and did a few rounds of shape and encase to create the final form.
 My favorite part of this piece is all of the bubbles; created by leaving divots instead of a smooth surface when dipping into the furnace for another layer of glass. There is a particularly lovely streak of teeny bubbles, and one large bubble in the center.
As always, thanks to the husband for the photography.
Chocolate Chip Cookies.
7.26.2012
This is my recipe for nice chewy chocolate chip cookies. They usually don't last long enough to go stale.

Icicle.
7.8.2012
 I made this icicle during an Art By Fire Blow Your Own event in January of 2010.
 There are many ways to make an icicle, but workflow for this one was to grab a pre-heated hunk of scrap color (opaque works well here), twist it around, and then encase the color. Then even out the heat, flatten the pice with the tags, (reheat) and use the tweezers to twist it up. Last, knock it off into a nest and put a hook on it. The top of this icicle didn't twist much compared to the bottom (the top could have used more heat), but I like the shape anyway.
As always, thanks to the husband for the photography.
Olympic Color Rods.
6.2.2012
It doesn't seem like it's been all that long, but I've been a student glassblower for 3 years. When I first started taking glassblowing lessons, I would always buy glass color supplies from the convenient store inside the hotshop.
But in the past year, I've been going to Olympic Color Rods, and I really do prefer them for glassblowing supplies. The folks at OCR are always super nice, and they're great at helping me find what I want, or explaining something if I'm not sure what I'm looking for. And they've got tons of copies of Ed Schmid's glassblowing books (both Beginning and Advanced), which Amazon doesn't seem to stock.
The best thing about buying your color at OCR is that they've got several huge bins of scrap bar color, and they'll let you select which chunks of scrap you want. You can dig through the scrap box and choose those lovely reds, pinks and purples without getting stuck with more white or green from a pre-packed student color pack. I made this little amphora using one such scrap bar.

Ingrid the cat was very interested in my photography session.
Thank You, Stack Exchange.
4.23.2012
For the past couple years, I've been participating in an online web-programming question and answer site - Stack Overflow - and various other sites within the Stack Exchange family: Gaming, Cooking, Apple products, and even Board Games. Recently, I've earned the fabulous prizes shown here for creating good site content: an iPod Touch, , and .

Thank you, Stack Exchange.
Fused Glass at Glassique.
2.29.2012
Last fall I took another fused glass class via a Groupon, this time at in Seattle. We must have been good students - you can see up on Glassique's site.

I learned some new things at this Glassique class, particularly how to use the circle-cutter. I also got to play with stringers (for the very thin lines), which was fun. But I was a bit dissapointed that all we made was pendants and garden-hangers, since I want to make bigger pieces such as plates and bowls. Let me know if you're interested in any of these pendants - I'll probably be putting them up on Etsy soon.
If you're interested in fusing jewelery, I do recommend this class - the staff was knowledgeable and friendly, and all the tools and materials (large sheets of glass, not just scrap glass) were included.
As always, thanks to the husband for the photography.
Intro to Fused Glass.
1.4.2012
This summer, I took an "Intro to Glass Fusing" class at Aquila Glass School in Portland. Instructor Scott Curn showed off several finished fused pieces and explained how we could get the same effect as the demo piece. Then we made our own fused glass plates, and a few pendants which are not shown here. The class was a great introduction to both glass fusing and Aquila's studio. My only complaint is that the class didn't teach us how to cut large pieces of glass, but the staff is willing to teach that if you come in for open studio time.

This small nut bowl was the result of Scott's challenge to take a boring grey square and "make it art". For "art", I decided that pink was in order. I'm really in love with the result - particularly the slightly pulled-in sides of the dish.

This was the "go crazy" plate, where each student got full access to the scrap drawer to build on their clear glass rectangle. There was a reasonable selection of large pieces from the blue bin, so I grabbed some nice ones and made this patchwork pattern. This plate is great for servicing fancy truffles, or crackers and cheese.
I was surprised at how easy glass fusing is; compared to glass blowing. Fusing is pretty much about cutting glass, stacking it, and then melting it. While fusing isn't quite as fun as blowing glass, but it is much easier to do in hot weather.
If you want to learn about glass fusing, check out Bullseye Glass' online video kilnforming lessons. They have a few videos available for free!
As always, thanks to the husband for the photography.
Cookies For Science.
12.15.2011
I have been struggling recently with the question of how old can baking soda get before it's inappropriate for baking. I decided to do some science - and baked up these cookies last Sunday night.

The above picture shows the cookies made the old baking soda, after having cooled on the rack for about half an hour. They're a little flat; they're tallest where the chocolate chips provide structure for the dough.

The above picture shows the cookies made the new baking soda (sorry for the poor focus). These cookies are puffy; the dough holds it's own structure.

A cookie with old baking soda is on the left, and a cookie with new baking soda is on the right.

As before, the cookies with old baking soda are on the left, and the cookies with new baking soda are on the right. The stack on the right is clearly much taller.
The Results
The results were clear to me - the old baking soda delivered a significantly worse cookie. The cookies made with old baking soda were too flat (they were puddles of dough clinging to chocolate chips), and dried out in just 2 days. The cookies with new baking soda were cookie shaped; and still tasty 4 days later. I hereby strengthen my resolve to buy new baking soda every 6 months.
The Recipe
Here is the recipe that I used:
- 11 1/4 oz all purpose flour
- 1 teaspoon baking soda
- 1 teaspoon salt
- 1/2 cup butter (room temperature)
- 1/2 cup shortening
- 3/4 cup granulated sugar
- 3/4 cup packed brown sugar
- 2 large eggs
- 1 teaspoon vanilla extract
Stir flour, baking soda and salt together. Cream the butter, shortening, white and brown sugar. Add eggs, one by one, to creamed mixture and beat until incorporated, then add vanilla. Gradually mix in flour mixture. Dish rough tablespoons of dough onto a baking sheet and baked for 9.5 minutes at 350° F (until golden brown and delicious). Allow cookies to set on cookie sheets, and to cool on wire racks.
Test Methodology
I prepared two mixtures of 5 5/8th oz flour and 1/2 teaspoon salt, and added 1/2 teaspoon of each version of baking soda to each mixture. I prepared two mixtures of 1/2 teaspoon of vanilla extract and 1 egg for each batch of dough.
I creamed the entire recipe of butter, shortening and both sugars together, weighed the total amount (with the bowl zeroed out), and spooned material out of that bowl until was split in half. While finishing the dough and baking, I stored the creamed mixtures and dough in the refrigerator.
The dough with the old baking soda got proper chocolate chips. I figured this would give them the best chance at being tall; as the chips provided some height. The dough with the new baking soda got chopped bar chocolate, which contributed to its darker color (and did help me to tell the cookies apart.)
Science is re-producible, so I urge you to preform your own experiments!
Blue Glass Pumpkin.
10.31.2011
This is another of the pumpkins that I made at in fall of 2009. As before, professional glassblower Lon Clark did most of the work here.
 I did select the colors. I love how the blue and purple, blue and green spread out into jewel tones.
As always, thanks to the husband for the photography.
I did select the colors. I love how the blue and purple, blue and green spread out into jewel tones.
As always, thanks to the husband for the photography.
Brown Glass Pumpkin.
10.10.2011
This is another of the pumpkins that I made during one of Art By Fire's Blow Your Own events in fall of 2009.

What I love about this pumpkin is its deep ridges and squatty shape. I do think that the clear stems that Art By Fire uses for their events is a missed opportunity.
As always, thanks to the husband for the photography.
Purple Glass Pumpkin.
9.26.2011
For a few months in the fall of 2009, in Ballard put a "Blow Your Own Glass Pumpkin" sign out on the sidewalk on the weekends. I went in as often as I could, and this is one of the pumpkins I make there, under the tutelage of professional glassblower Lon Clark. (I had more of a hand in shaping of this pumpkin than with previous ones. Lon deserves credit for all that is perfect in this pumpkin; while anything imperfect is surely by my hand.)

This is one of my least-pumpkiny-looking pumpkins, but it is also one of my favorites. I love the color scheme (which I picked out), and I love the resulting "gumdrop" shape.
As always, thanks to the husband for the photography.
Christmas Sucky Bowl.
9.6.2011
This is an example of a very simple beginner's form - the sucky bowl. It's a bubble except that the top half has been re-heated and sucked back to form the bowl. I believe that I made this at an Art By Fire blow your own event in the second half of 2009.

As always, thanks to the husband for the photography.
The Last Sup(p)er and the The Cardboard Robot Suit.
7.18.2011
The husband and I again participated in the Seattle 48 Hour Film Project, where teams compete to write, film, edit and deliver a short film in just 48 hours. You can watch our short film . The required elements were:
- Stephen or Stephanie Dufour, a wedding planner
- Dialogue: "When are you going to get it together?"
- Prop: A paint can (regular or spray paint)
er")
Because it only appeared for a few frames, you probably didn't get to appreciate all the detail on The Cardboard Robot's suit. Hopefully, the above image will help remedy that.
An Ode to the USA Space Shuttles.
6.19.2011
In honor of the last launch of a U.S.A. Space Shuttle, I present to you Space Shuttles in 3 forms:

This is the only one of these Shuttles that I made. The set has over 1200 pieces, and took me about a week to build.

This crochet Space Shuttle is brilliant and cute. But if I had one, the cats would steal it for a cat toy.

This last Shuttle is made of glass, by Brandon Cupp at Seattle Glassblowing Studio. Though my picture doesn't do it justice, this is easily the most impressive version of the Shuttle. (Except the Shuttle in orbit right now, of course.)
Cube Glass Paperweight.
6.19.2011
Two years ago, I made this paperweight in my first glassblowing class. I flattened the edges by letting the glass rest on the marver for a few seconds on each side. The inner blue color is twisted scrap color (pieces from other work which broke), and the red dots are frit on another layer of glass.

Even though they can be quite , abstract paperweights are popular form in beginner's classes.
In a paperweight, just a little bit of color will go pretty far. Different of color (or bubbles) can be layered onto a paperweight by dipping the piece into clear glass.
Oh! Chocolate.
5.30.2011
Last year, I used one of my Groupons at Oh! Chocolate - a Seattle chocolatier / confectioner with locations in Mercer Island, Madison Park and Bellvue Place. I got the lovely box of truffles in this picture, and a delicious bag of "mistakes". The truffles were quite good, but I enjoyed the mistakes (which featured some chocolate-covered marshmallows and fruit) even more.

World's Fanciest Butter Dish.
4.11.2011
This piece's original destiny was an oval shaped platter, but I liked the shape when it was half bowl / half platter, so I stopped flattening then and boxed it. The oval shape comes from using the cork paddles to flatten the piece (as seen before on Mr. Ugly) before transferring to the punty.

This color application was a base layer of K20 Brilliant Yellow, with a "hot cross swirl" in K61 Dense White. The gaffer touches the hot colored bit (white, in this case) to the moile, draws it around the piece to the opposite side of the moile, rotates the pipe 90°, and draws the color across the bubble again. I had a lot of space in-between one of my stripes, so I drew on another leg with the color bit. Unfortunately, the yellow and white colors burned together - creating the ugly brown smudges. My instructor says it's probably not the white that's the main culprit, but the yellow.

This piece is the perfect size for a stick of butter. Of course, it also holds candy.

As always, thanks to the husband for the photography. Except for the 3rd photo here - I deserve all the blame for that out of focus mess.
Mr. Ugly.
3.9.2011
I made this piece during January of 2010, at the Beginner II class at Seattle Glassblowing Studio. I used some some very cool techniques, which combined to make the ugliest thing I've ever made.

I love the tiny bubbles in this piece, which are more visible below. This is done by quickly dunking the hot glass into a freshly stirred bucket of water with baking soda. You've probably seen this on countless Mexican-themed pitcher and tumbler sets, usually with a cobalt blue lip wrap.

The blue marks on this piece are cane drawing, where the gaffer "draws" on the piece using a thin noodle-like piece of colored glass. The cane didn't stick to the piece where I intended, and it cut my hand a little when it snapped halfway through. I haven't yet seen an application of cane drawing that I like; it always reminds me of a .
The piece is oval shaped, rather than round. The gaffer does this using cork paddles while the assistant heats and flips the piece at the gaffer's command.
While I think that this particular vessel is pretty hideous, a lot of people like it. I gave it away during an "Ugly Glass Exchange" / white elephant party around Christmas. The person who got it seemed to like it. Beauty really is in the eye of the beholder, eh?
As always, thanks to the husband for the photography.
Potion Vase
1.17.2011
I made this piece during November or December of 2009, at the Beginner II class at Seattle Glassblowing Studio. I didn't have a specific shape in mind when I started on this piece, and I'm pretty happy with how it turned out in the end. To me, it looks like a vessel for a magical potion of some kind.

This was also my first experience where different colors interacted with each other. The red of the main body, and the white of the swirl reacted with each other, creating those ugly brown edges where the two colors meet. I've been keeping notes on which color combination react (or "burn"), and this particular white (Kugler K61 / enamel white) tends to react with many other colors.
As always, thanks to the husband for the photography.
Pew Pew Laser Moon!
12.16.2010
Google created to "individually" thank each one of its advertisers. It's pretty funny, actually.

The Perfect Pumpkin.
10.25.2010
Last Halloween, while out doing the grocery shopping, I noticed a "Blow Your Own Glass Pumpkin" sidewalk sign. So I insisted that the husband stop at . This was my first visit to this studio, and I didn't have my special glassblower glasses with me, so I acted just like a regular customer.

Professional glassblower Lon Clark did most of the work for this blow your own event. I picked the colors (orange with a bit of red for the body, and metallic brown stem), and blew the pumpkin's bubble, but Lon did all of the shaping and other work - including the perfectly curly stem.
As always, thanks to the husband for the photography.
Applejack Daisy Tumbler.
8.18.2010
This is yet another early "tumbler", which I made during a class at Seattle Glassblowing Studio last November. It's a bit small (only 3 or 4 inches tall) and it's got quite a lot of tool marks. However, it's relatively straight, so I'm very proud of this early piece.

I occasionally insist that the husband perpare an Applejack Daisy for me in my very own glass.
As always, thanks to the husband for the photography.
Glass Pumpkin 2009 #3.
7.18.2010
This is another blown glass pumpkin from last fall. I made this at Art By Fire in Issaquah. Art By Fire does a clear stem rather than a colored stem, which is a bit of a shame since colored stems look so nice. They also use the mold with the wider ridges, which results a much more pumpkiny-shaped pumpkin.

The monthly Blow Your Own events were much more convenient when Art By Fire was in Ballard. We could take a leisurely walk down to the glass shop and then grab dinner at or . Now we've got to dash out of work, and slog through freeway and bridge traffic get to the Issaquah location. There is a bright side though - we can get dinner at the Issaquah Brewhouse. In fact, that's the husband's payoff for coming out to Issaquah with me - Rogue beer.
The New EGM, and a Refund From MAXIM.
7.4.2010
I am now the proud recipient of my very first new EGM, as well as a $3.33 refund for my old EGM subscription, which was replaced with MAXIM when they stopped publishing EGM. Yes, 3 dollars and 33 cents, and it was totally worth it. It's the principle of the thing.

Glass Bud Vase.
6.21.2010
This small vase is another piece from my Beginner's II class at Seattle Glassblowing Studio last November.

Six months after my first glassblowing class, I took a second one. This was the first piece I made in that class. It was supposed to be a simple straight cylinder, but I had quite a lot of trouble with it. I was imagining something much larger, and after spending a really long time on it, I just ended up with this little thing. I was disappointed at first, but now I can appreciate that this piece makes a cute little bud vase.
Thanks to the husband for the photography.
Fluted Bowl with a Two Color Optic Twist.
6.3.2010.2010
I made this a fluted bowl (with a two-color optic twist) in my Beginner's II class at Seattle Glassblowing Studio last November.

The optic twist technique is pretty interesting. I mixed the blue and yellow frit together and picked it up on a single gather without a starter bubble. (The bubble would get all messed up during the color application.) I then heated the glass and shaped it for the optic mold. I dropped the glass into the mold, which cuts the outer layer of color into stripes. I heated the color again, and turned the pipe while dragging the color stripes along the marver, adding the twist. To finish the color twist, I used the diamond shears to grab a nubbin of glass on the bottom of the piece and rolled the pipe down the bench rails while holding the nubbin with the shears.
I then shaped and blew the bowl form out, and heated the rim to give it the ruffled shape.
As always, thanks to the husband for the photography.
Glass Pumpkin 2010 #2.
4.29.2010
Here is another of my attempts at a glass pumpkin. I did this one during a "blow your own" session at , a little glassblowing studio quite close to home. This pumpkin is less than perfect because I asked to do more in way of heating and shaping the piece than with previous pieces. But I still think it's quite cute!

After shaping the pumpkin body, it still needs a stem, which I find quite intimidating. You have to gather a bit, pick up the color, and dunk it in the mold. Then you attach it to the pumpkin, twist the bitrod, and swirl it around some kind of tube. Lastly, cut the stem off the pipe and torch the end to smooth it. And you have to do all of this quickly, before the pumpkin body shatters! Lon, the professional glassblower, did this stem.
As always, thanks to the husband for the photography.
The World's Best Banana Split.
4.22.2010
This is the . It's got banana halves with a carmlized sugar crust, toasted almond slivers, whipped cream, and a scoop each of chocolate ice cream, strawberry sorbet, and fancy vanilla ice cream. And, of course, it comes with a cherry on top.

Two Tone Flower Glass Paperweight.
3.31.2010
I made this glass paperweight during my first glassblowing class at Art By Fire last year, and one of my favorite pieces from that class. I was trying to replicate a red tulip with yellow highlights in the center. I'm looking forward to focusing on more simple flower paperweights when I can grab some time in the shop.

As always, thanks to the husband for the photography.
Flour - Converting Volume to Weight.
3.12.2010
When baking, I prefer to measure flour by weight rather than by volume, particularly when measuring flour. The best results come from the precise and repeatable measurement of ingredients that measuring by weight delivers.

To avoid flat cookies like the ones on the left, use this chart to covert the volume-based measurments called for in most recipes into a weight for your kitchen scale.
Glass Cactus Pumpkins.
2.20.2010
These are the two pumpkins I made at a Seattle Glassblowing Studio's Pumpkin Making Workshop last October. During this 4 hour workshop, instructors showed me and 5 other people how to work with glass and create the pumpkins. Because I'd had a wee bit of prior experience, I skipped the paperweight part went straight to working on pumpkins.

I love glass pumpkins; I think they're my favorite form. To make a proper pumpkin, the gaffer uses a mold to put the ridges in the pumpkin, and flattens the bubble to the squat pumpkin shape. The assistant (or in this case, the instructor) prepares the stem in a mold, and twists it around a pipe to make the curly stem.
Unfortunately, these pumpkins weren't quite perfect. The taller one got a too long jackline, so I couldn't squat it correctly. Then we put the stem on a bit too hot, and it ended up looking like a cactus. The second one came out a little better; I was able to flatten the piece. The stem was again, a bit too hot, and made a big giant connection on the top of the pumpkin.
I later caught several other pumpkin "blow your own" events, and those came out much better. But I do plan to do a pumpkin workshop if available later this year.
Phoenix Mix Ornament.
1.25.2010
I made this ornament at a "Blow Your Own" event at Art By Fire. This particular mix of frit makes me think of phoenix; the mythical firebird. As always, thanks to the husband for the lovely photo.

I was pleased with how this ornament came out. I like being able to see just a bit of clear in-between the opaque bits of frit. You can get a sense of the motions which created this ornament by the shaping of the colored bits: the bottom of the ornament is blown out while the top is squeezed in.
Snickerdoodles.
1.15.2010
While these aren't my personal favorite cookie, they are my most requested cookie. The husband and many co-workers agree that these are the best snickerdoodles in the world. I keep the cinnamon and sugar mixture on-hand in a small jar; I re-use it for the next batch of snickerdoodles, or on buttered toast. Here's the recipe.

Troublecat is Trouble.
1.5.2010
Our Miss Ingrid (a calico cat) has a well earned reputation for causing trouble. Here she is modeling the evidence of an escapade that didn't go so well.

We had purchased some slippers decorated with large fluffy feathery bits, and left them in a paper bag on our nightstand when we went out. When we came home, this is how we found Ingrid. She had been going after the irresistibly fluffy slippers, and got caught inside the bag's handles.

She eventually found a way free of the bag, and probably spent the rest of the afternoon under the bed. We cut her loose after we had preserved the moment for prosperity.
Domestic Brilliance.
11.23.2009
The husband is quite brilliant around the house. He devised this elegant solution to preventing the marks that our new metal shower rack kept leaving on the shower tile. He cut some plastic tubing into inch long strips, and sliced down one side of each tube to create a jacket. He then slid the tube jackets around the legs of the shower rack, where they act as a sturdy bumper between tile and rack. How very clever!

Halloween 2009.
11.01.2009
I made these cute (and tasty) ghost cupcakes for Halloween this year. They are constructed from this chocolate cake recipe (bake regular sized cupcakes for 17 minutes), the "Love Buns" topping, and some eyeball sprinkles that I found at Cookies in Ballard. The frosting did fall a little overnight, so next time I'll try a full on seven minute frosting recipe.

Glass Work - First Half of 2009.
10.27.2009
In April, the husband and I took a vacation to the Lincoln City area of the Oregon coast. We happened upon the , so I signed up to blow my very own glass float.

In June, I took a beginner's glass blowing class at Art By Fire. During the four 4 hour classes, I made a bowl, a drinking glass, an ornament, paperweights and sculptures.

In addition to structured classes, Art By Fire also offers once a month special events where even the absolute beginner can walk in and (guided heavily by the pros) create a piece in 15 minutes. In the first half of the year, I made another ornament and two small bowls during these events.

Here is a close up of the glass bowl that I made during the beginner's class. I've filled it with the cute jack-o-lantern Lindt truffles for Halloween. The bowl will last much longer than the truffles.

Many thanks to the husband for his effort producing all these wonderful photographs.
Love Buns.
9.27.2009
Last month, I made a new recipe for cupcakes - or "Love Buns". The cakes were a bit dense, and the frosting approached a marshmallow consistency. These cupcake came out a little boring, but the would make a good sturdy base for strong flavors.

PAX '09.
9.8.2009
This weekend I went to PAX - a gaming exposition in Seattle put on by the folks at Penny Arcade. It was a ton of fun, though the Saturday night concerts (with opening band Freezepop, Headliners Paul and Storm, and Closing Act Jonathan Coulton) until 2 am was a little extreme. I also came home with a little .

Cupcakewrecks.
9.1.2009
I love cupcakes in ice cream cones; my mom made some very cute clown versions when I was a kid. Unfortunately, my ice cream cone cupcakes didn't work as well. The erupted batter on the outside burnt into an unremovable crust. As you can see here, I frosted (dipped, really) and decorated them anyway. They look a little wrecky, but I think they're also a bit charming.

Captain Ron's / The Dory Cove.
8.10.2009
Ron's appeared to be the successor to the Dory Cove, inheriting their menu and (supposedly) cookbook. During last spring's trip, the husband and I checked Captain Ron's out.

Sadly, Captain Ron's is rather less than the Dory cove. If you go, go for the chowder; somehow it's not as good as at the Dory Cove, but it's quite good. Skip the fried seafood - it was quite heavy on the "fried" and light on the "seafood".

Chocolate Pods.
7.24.2009
These chocolate pods from a real live cacao tree seemed browner in person than the photograph would indicate.

Pihea Vista.
7.23.2009
Oh yes, we made it to Pihea Vista - there and back on the dastardly vertical 1.8 mile Pihea trail. Behind us is (probably) Mt. Wai'ale'ali, and in front of us is a huge drop down Napali to the Pacific Ocean.

Snorkeling, Helicopters, Snorkeling.
7.22.2009
I discovered snorkeling in Kauai. I'd rather be snorkeling than doing pretty much anything else.

We also took a helicopter tour of the island of Kauai. I assure you, there's a rainbow in that picture.

Here is a Moorish Idol, taken from Poipu Beach near our condo. Credit to the husband for taking this photo.

Around Poipu.
7.18.2009
The condo we stayed at is right against an idyllic beach in Poipu.

An astonishing variety of fruit bearing trees grows all over Hawaii - such as coconut, pineapple, avocado, and papaya. Here are some avocados growing in old Koloa town square near Poipu.

Just a quick drive from Poipu is a water fountain created by waves rushing through a lava tube called Spouting Horn.

USS Arizona Memorial.
7.17.2009
This memorial crosses the sunken remains of the USS Arizona in Pearl Harbor. Only a couple dozen people at a time are allowed on the memorial.

Waikiki Beach.
7.15.2009
The beaches at Waikiki were irresistible. The water was clear and warm, and very calm.

We ended up at Cheeseburger in Paradise for dinner - not related to the nearby Jimmy Buffet's or his Margaritavilles. Here I am enjoying a tropical drink.

Mokolii Rock.
7.14.2009
This is Mokolii Rock, also known as Chinaman's Hat on Oahu. Our tour bus driver to the Polynesian Cultural Center pulled off at this view point and asked if anyone would like to get out and take pictures?

Glass Sculpture.
7.12.2009
By demand, here is another glass piece that I made during the last of my beginner's glass blowing classes. It's a free-form sculpture roughly 9 inches high. It's got a bit of a bulbous oval at the bottom, and as I flared the top edges, they took on a tail-fin appearance. It was fun to make; an exercise in working the materials into a shape that I liked. Next time I might go for a more definite fish shape.

Snorkel Fish!
7.3.2009
Snorkeling is awesome. Many thanks to the husband for getting a waterproof camera bag for our trip, and for his advice and guidance tweaking the photo in Adobe Photoshop.

My Globby Glass.
6.24.2009
This is my globby glass. I made it during my second glass blowing class. It's a drinking vessel; that's right folks, it will contain liquid! It may be blobby and misshapen, but I love it, because I made it. Many thanks to the husband for taking the photo.

Making Glass.
5.24.2009
I enjoy that working with glass is both an art and a technical craft. Each finished piece is absolutely unique, and very different from more common 'arts and crafts'. Most of all, I like the permanence of glass pieces. Practically all of the work I do on computers is intangible, always changeable, and never perfected. Once glass is done, it's done, and it's going to last a very very long time.

A Sounders FC Supporter.
5.13.2009
Cotten is more pleased to be sitting in my office chair than he is to wear the Sounders scarf.

Irish Soda Bread.
3.11.2009
This recipe for Irish Soda Bread (white, rather than whole wheat) is reasonably easy and very forgiving. It's a great if you just want to start making your own homemade bread.

What Did I Say About the Taunting?
1.4.2009
As we were driving home from some lovely half-price gift card shopping, we started getting some rain with hard middles hitting our windshield. The husband boldly proclaimed that it wasn't remotely cold enough to stick. The snow, which did not like being taunted in this manner, quickly set its mind to sticking. And here's our backyard now.

Do Not Taunt Seattle Weather.
12.18.2008
Today, the Seattle city core finally got the snow that had been threatening for the past few days. It snowed little flakes all day long, and got very windy during the middle of the day. The cats love work from home days.

Red Velvet Cupcakes.
10.20.2008
I decided to make some Red Velvet cupcakes this weekend. Do they look like anything to you? Pumpkins, perhaps?

Chocolate Cupcakes.
7.30.2008
These are some chocolate cupcakes I made this weekend. You can get the cupcake recipe here, and the frosting recipe here.

Literally Not Enough Room.
6.4.2008
"The cart size of the DS makes it impossible to put out ports of any of our old graphic adventures. There's literally not enough room on those carts to put the games out." - Jeffrey Gullett, LucasArts assistant producer, from Game|Life


Yes, Mr. Gullett, I can see that it is physically not enough room to fit those big old games on DS cards. But I'm sure that LucasArts' large and talented staff of programmers can figure something out.
My Enemy - the Fat Cell.
6.3.2008
You can get your own cute plushy enemy for inspiration from .

Synchronized Napping.
5.2.2008
The kitties have been practicing since last summer. They are now world class champions at napping.

Ballard News.
3.20.2008

Here is the little old lady's house in Ballard, that is on the lot where a commerical complex (including a Trader Joe's and a gym) is being built.

Cats and Mice.
2.13.2008
For Christmas, my mom knitted these wool mice, and filled them with organic catnip. Do the kitties like them? Why, yes, they like them very much.


These Cookies are Not a Lie.
12.9.2007
These are basically sugar cookies, filled with jam, dusted with powdered sugar, and drizzled with chocolate. The green ones are filled with mint jelly, and red ones are filled with our homemade raspberry jam.

Drooly Jack O' Lantern.
10.29.2007
Last night the husbad and I carved a pumpkin. We're very pleased with our Jack O' Lantern, even if it is a little drooly.


Halloween Cupcakes - Success!
10.8.2007

Success! These Halloween cupcakes came out much better than those from last year, especially in the frosting department. But I do wish I'd had paper liners.
Meet Ingrid and Cotten.
7.26.2007
Sweet and cute and fluffy, times two. What more could you ask for?

Canada - Redeemed.
6.25.2007
Here are some photos for our recent anniversary trip to Victoria. Though the husband took the photo of the fire juggler, I took all the rest.


We went to the Butterfly Gardens, an indoor butterfly zoo. I don't know recall the name of the large blue butterflies, but they're quite tricky to photograph, because they very rarely open up their wings when they land. I got very lucky - twice!

We also spent a lot of time at Butchart Gardens. Lovely. I also dig snapdragons.

Skagit Valley Tulips
4.15.2007

These are some of the photos I took from our trip to the Tulip Festival in Skagit Valley on Sunday. That evening, I ordered a bunch of tulip bulbs to plant in fall.


Harbor Blossoms
3.4.2007
The pink exploded all over Seattle this month. I took this picture much earlier in the month.

Poor Goomba
2.2.2007
He just can't get this CSS figured out.

Arctic Invasion
1.12.2007
It freakin' snowed again. Everyone always says Seattle never gets this kind of weather, but Chudson says that we always get the Arctic fronts first. Here's a picture of it snowing on our apartment just after we got home Wednesday night.

The hubby and I both got new cameras for Christmas, so took them outside and we both took several pictures. It got a little meta.

The apartments highest on the hill have a nice view of downtown Seattle.

This yellow cab was crazy. He kept trying to get up the steep steep hill that larger cars were having trouble with. Look under his front, and you can see he's got a traffic cone stuck there!

The little mailvan in the distance was working hard, and just barely managing to get up the hill. Neither rain, nor snow, nor sleet, eh?

Snow, Snow!
11.28.2006
A mid-day shot of our apartment under the snow. It's somewhat thin, but very crunchy because we're still below freezing in the middle of the day.

Me and My Office
11.21.2006
We have a saying at the office. "People who do real work have dual monitors."

Check out that nice tall comfy pleather chair. It goes "poof" when I sit in it. Special thanks to Mey for the awesome posters.

Why, yes, that bright thing in the back of my office is a window. I can see the real world though it. This image shows, clockwise from the lower left corner, my window view from left to right.

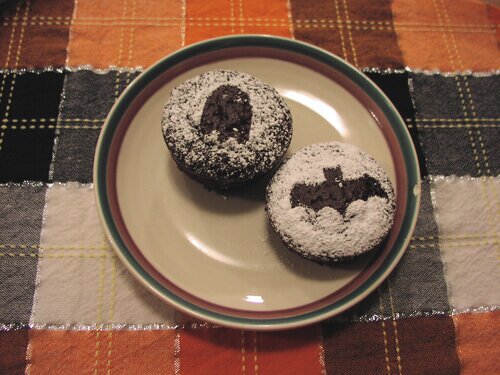
Halloween Cupcakes
10.31.2006
If you've screwed up your frosting, just cut out some shapes as stencils, and sprinkle confectioner's sugar over them.
White Water Rafting
7.21.2006
When I was working at Hollywood Video, we had took a white water rafting trip as a team building activity. At first I was very worried about falling out or being very bad at rafting, but it was really awesome! It was the most fun I've ever had on a work day!
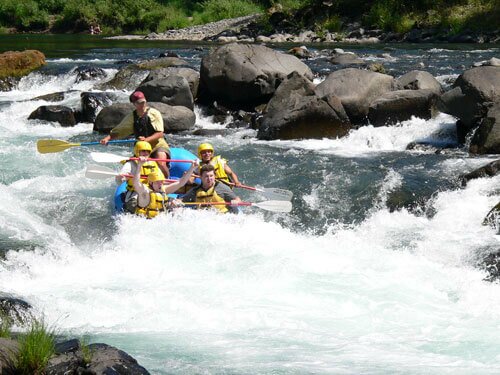
Ah, the Clackamas river. What better way to cool down on a 105° day? In both these pictures, I'm on the left side, second helmet back.

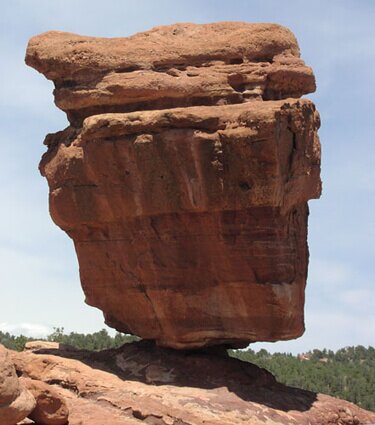
The Balancing Rock
5.29.2006
Here's the Balancing Rock from the Garden of the Gods in Colorado Springs. No tricks on the other side, it's just like that.
Groom's Cake
5.28.2006
Here's the groom's cake from a recent wedding we attended. Lucky groom! I got a little of that action, and it was fine.

Tulips
4.10.2005
I love tulips. Here are some I grew in my backyard. They're bulbs, and the awesome thing about bulbs is that for the first year, all the work is already done. Just toss them into a hole, and water sometimes. It's so easy.

What is it?
8.25.2005
Seriously, I don't know. I know it's in Disneyland, but damned if I can figure out what it is.