Blogs about nodebots
8.2.2017
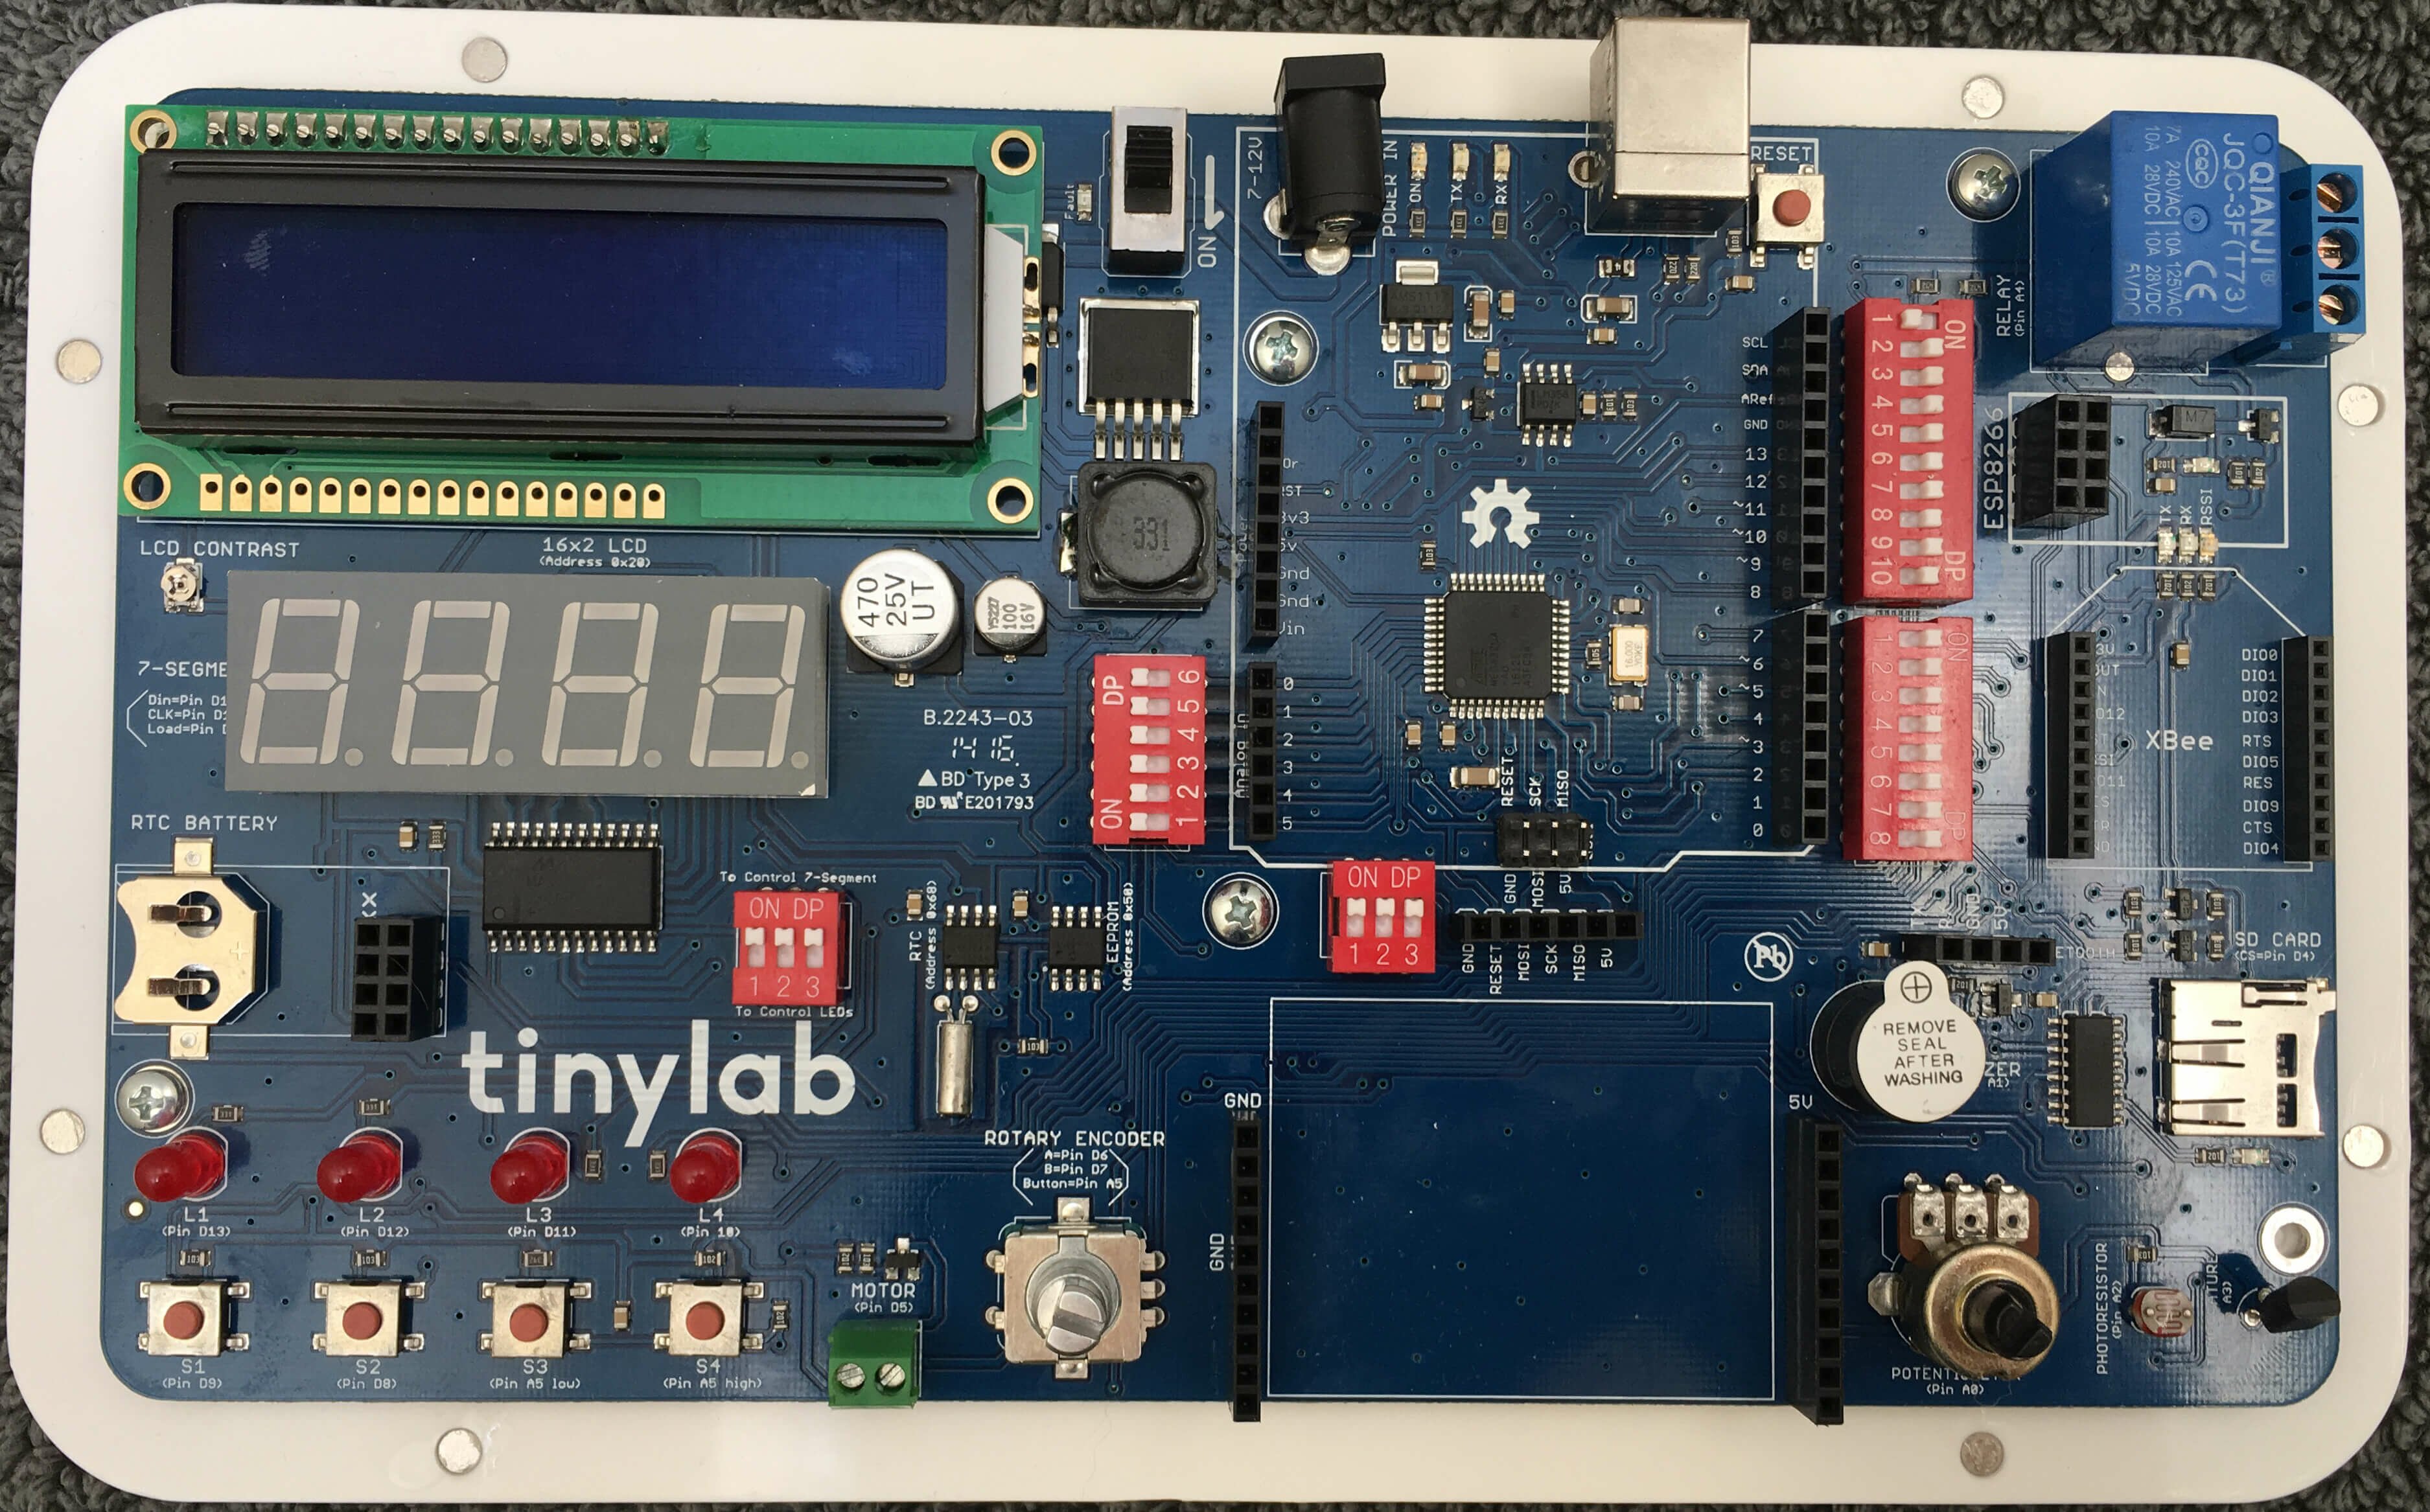 I've been fiddling around with my - an all-in-one prototyping board with an embedded Leonardo and a fair selection of components. I'd already got it working with Node and Johnny-Five. Next I wanted to do something which demonstrated interaction between the software and some real-world conditions.
Note that my tinylab (perhaps because it's an early crowd-funded version) doesn't have the breadboard shown in the current production versions of the tinylab. No worries - mini breadboard (without the connector tabs) fits in there perfectly.
I made a "flashlight" - where an LED gets brighter when the hardware detects less ambient light. Since all the components on the tinylab are already built in, I didn't have to do any wiring. It's pretty easy to test by covering the photoresistor with your finger. Here is the code:
var five = require("johnny-five"), board, photoresistor;
var board = new five.Board();

board.on("ready", function(){

  var led1 = new five.Led(10);

  photoresistor = new five.Sensor({
    pin: "A2",
    freq: 500 // Data is polled every half second
  });

  maxLight = 750 // Set this to the "high" value of light in your room.
  minLight = 250 // Set this to the "low" value of light in your room.
  lightRange = (maxLight - minLight) // Will change for different rooms.

  photoresistor.on("data", function() {

    currentLight = this.value;
    ledValue = (((currentLight - minLight) * 255) / lightRange);
    ledValue = Math.max(ledValue, 0);
    ledValue = Math.min(ledValue, 255);

    console.log("Photosensor: " + this.value + "     ledValue: " + ledValue);
    led1.fade(ledValue, 500); // Smooth transition of LED brightness

  });

});
You'll need to set the maxLight and minLight values for your environment.
With this experiment, you now have a way to read a value from your environment, report it to a computer, and act on it.
4.7.2017
The STEMTera Breadboard is a nifty combination Ardunio (Uno R3) / breadboard. It has a Lego-compatible backside and it's available in black, white, and pink. When I got mine, of course the first thing I did was get it set up to run with Johnny Five. 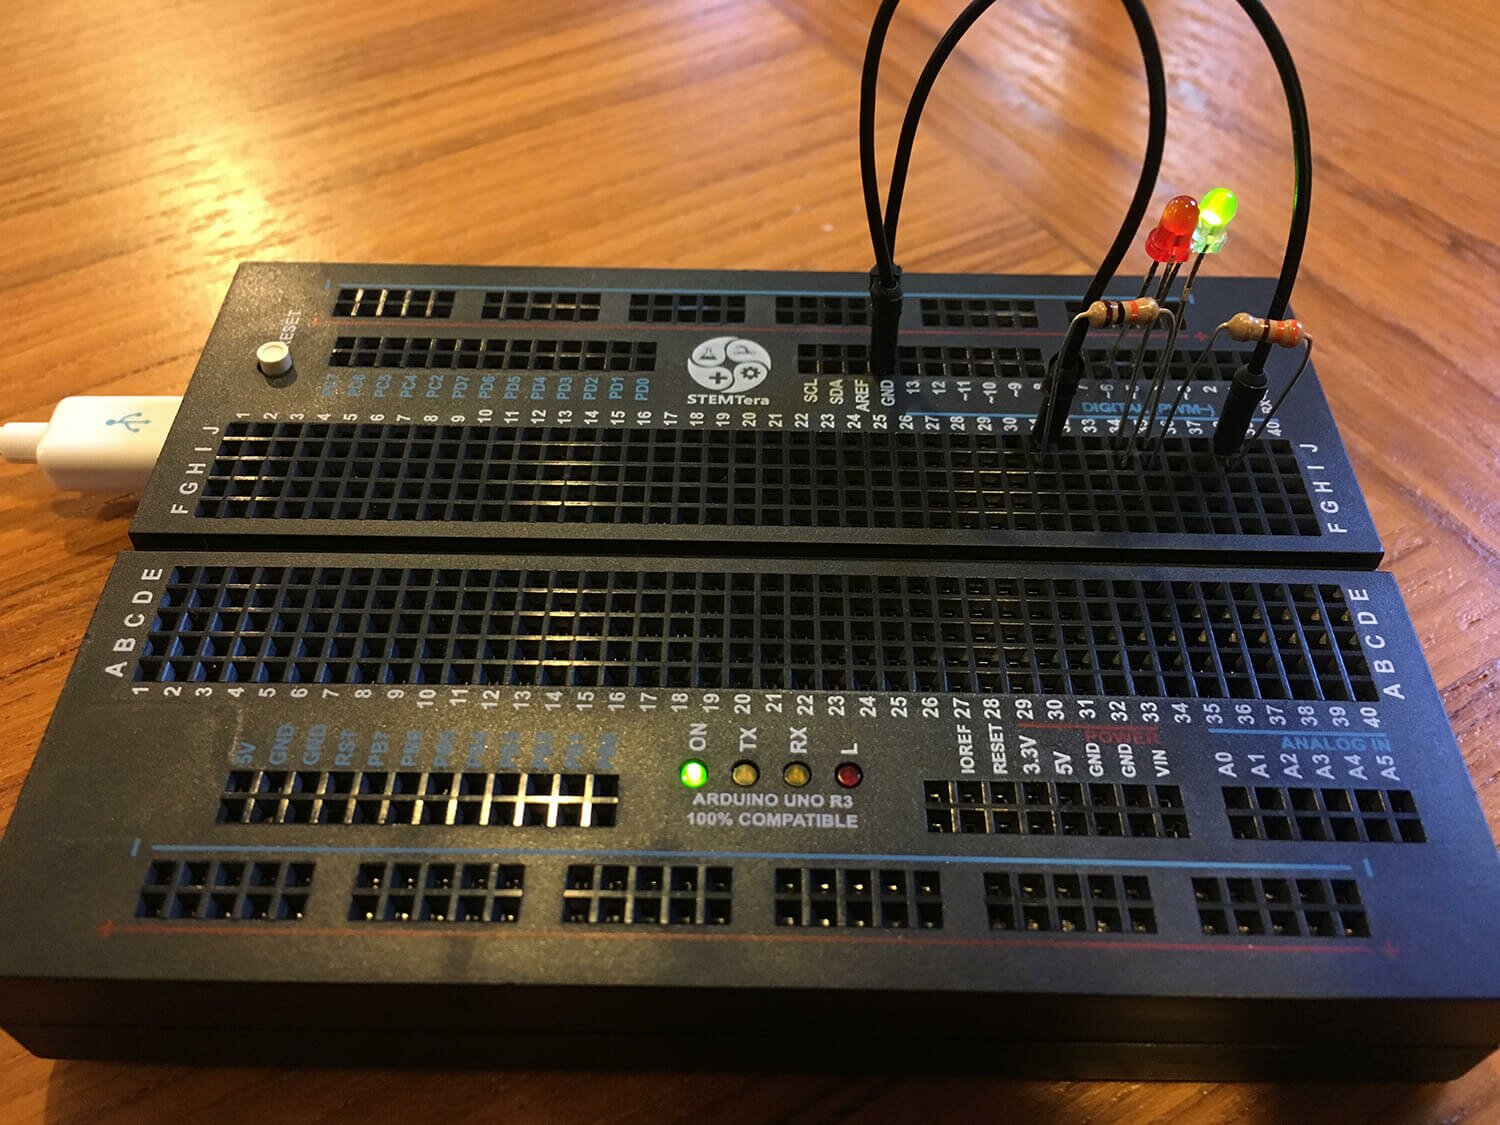
Basic Functionality / Hello world
Making an LED blink is the Hello world! of hardware. It's common to just use an Arduino's onboard LED on pin 13. Here's what you do to get up and running from scratch:
- Make sure Node, npm, Johnny-Five, and the Arduino app are all installed and updated.
- Connect the StemTera breadboard to your computer.
Protip: Be sure to use a USB mini cable that supports both charging and data transfer. I've been fooled more than once by a charging-only cable. When I tried using a charging-only cable to flash the Arduino, I'd see the "On" LED turn on, but the Arduino app didn't report the device on any port. I've since purged my supplies of any charging-only cables, hopefully.
- In the Arduino application, from the Tools menu, select Port and set it to whatever is newest (something like /dev/cu.usbmodem1441); the Arduino app should detect the port that your breadboard is connected to. Then from the Tools menu, set the Board to Arduino/Genuino Uno. Then from the File menu, choose Examples, then Firmata, and finally Standard Firmata. Then from the File menu, choose Upload. When the upload is successful, you can close the Arduino app.
- Open up your terminal / command line and create a new file called
blink.js. Navigate to this file's location. Put this code in the file and then save it:
var five = require("johnny-five");
var board = new five.Board();

board.on("ready", function() {
  led = new five.Led(13);
  led.strobe( 1000 );

  this.repl.inject({ // make led available as "led" in REPL
    led: led
  });

});
- From the command line, type
node blink.js and then hit enter or return.
- Your onboard LED should start blinking on and off every second - yay!
- In the new prompt from Node (called the REPL), you can interact with the board's LED. Try any one of these:
-
led.stop();: The LED will stop what it's doing, and stay at it's current state.
-
led.strobe(3000);: The LED will blink on and off every 3 seconds. You can change the 3000 to the number of milliseconds you want the LED to blink at.
led.off();led.on();
Red and Green LEDs
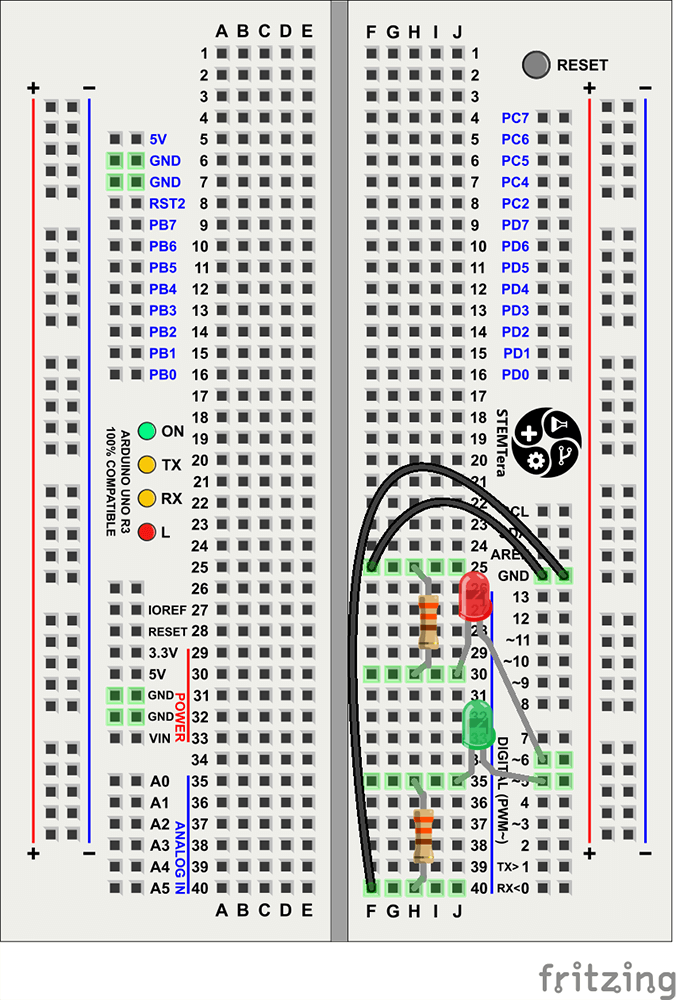 Now let's add external LEDs (and protective resistors of course). Build your circuit as shown here, using 2 330? resistors, two 3mm LEDs, and two jumper wires. This is the magic of the StemTERA breadboard - the circuit doesn't need to hop back and forth between the breadboard and the external Arduino.
Here's the code - store it in a file and run it as with the first block of code.
var five = require("johnny-five");
var board = new five.Board();

board.on("ready", function() {

  // We can address them separately, or together in leds
  var red = new five.Led(6);
  var green = new five.Led(5);
  var leds = new five.Leds([red, green]);

  green.off();
  red.on();
  leds.blink(1000);

  this.repl.inject({
    leds: leds
    // leds.stop() // Stop the strobing
    // leds.off // Turn them both off
    // leds.stop().off(); // Combine!
  });

});
You should see the red and green LEDs alternating between on and off every second, and only one of the LEDs will be on at a time.
The interesting thing about this code is that it uses the Leds class - which allows us to control all the LEDs at the same time. At first, the green LED is off, and the red one is on. Then we blink the leds class; flipping the on/off state of each LED at the same time. You could use this to easily control many more LEDs.
8.17.2016
I got my tinylab last week; it's a nifty little prototyping board with an Arduino Leonardo and a bunch of embedded components that was funded on IndieGoGo. So naturally I wanted to get Johnny-Five working and start fiddling with the tinylab as soon as possible. Unfortunately, it seems like the hardest part of every hardware project is the grand upgrading of the softwares that must proceed fiddling. Here's the process that worked for me.
-
Re-install Node. My Node installation was a few versions old, and somehow npm was missing. So I went ahead and installed Node.js from https://nodejs.org/en/download/. I decided to live dangerously and install the "Current" version rather than the Stable one.
-
Upgrade Arduino.app. My Arduino install was older than the Leonardo, so I needed to upgrade it too. I got version 1.6.10 from https://www.arduino.cc/en/Main/Software.
-
Upgrade npm packages.
npm outdated showed that several packages (including Johnny Five) were out of date. This required a few rounds of npm update.
-
Write the Johnny Five code. I checked the excellent Johnny Five docs and wrote this code for the first LED on the tinylab.
var five = require("johnny-five");
var board = new five.Board();

board.on("ready", function(){
  var led = new five.Led(13);
  led.pulse(1000);
});
This should make LED1 (on pin D13) pulse on an off. At first I tried using "D13" to address the LED (since that's what's silk-screened on the board) but it was just 13 that worked.
Success!
Here is some tinylab documentation that might come in handy next time:
2.10.2016
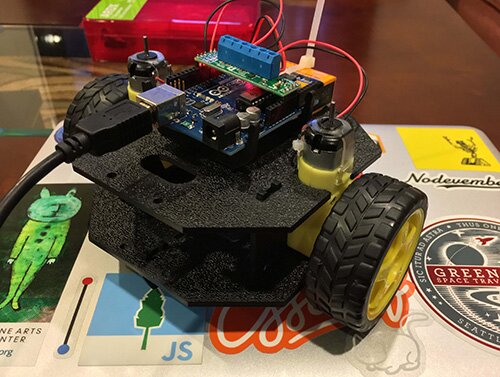
 Way back in May of 2015, I attended JSConf US to help with Bocoup's JS IRL event. The robot kit was designed by , and Rick and soldered pin headers to all the the motor controllers before the event. We helped around 100 attendees build a nice little Nodebot, and everyone got to take home their kit. If you want to build your own, here's what you need:
- 1 . This includes the Arduino Uno, pin headers, a breadboard, a cable, and a nice little selection of components for future fun and games.
- 1 . This kit includes the snap-together chassis, two motors, and two wheels.
- 1 Pololu DRV8835 Dual Motor Driver Shield. You'll need to solder on the included pin headers and terminal blocks; if you're ordering a large volume, there's a chance that Pololu might pre-solder them for you. (In the build instructions, Rick is using a very similar shield, but it's $3 more.)
- 1 nine volt battery
- 1 zip tie
Once you've got the bot running, there are a number of ways to extend it. (code).
Nodevember 2014.
11.18.2014
I was a selected speaker at this year's inaugural Nodevemer in Nashville last weekend. (You can view my talk "0 to Nodebots in 45 Minutes" at ; here are the related links: http://katiek2.github.io/0-to-nodebots-links/.) I was also able to attend some really great talks:
The Shoulders of Giants (Opening Keynote) - Eliza Brock
- The Pony Express operated for just 18 months.
- Open source saved browsers, and the internet. Firefox and Chrome revived browser development after IE stopped.
-
Let's just make the site twice. That will be easier.
-
Gartner's 2014 Hype Cycle for Emerging Technologies
- False confidence is not expertise. Business people choose based on confidence.
- Many people today have internet access via smart phones, not computers. This means they can't hack!
-
Software kills.
Gonzo Game Dev - Earle Castledine
- Basics of games - one infinite loop that:
- Gets user input
- Moves everything just a little bit
- Checks for collisions
- Draws everything
-
DHTML Lemmings - circa 2004
- Just use Canvas
- Use bounding boxes a bit smaller than the sprite for collisions
- Stick with 2-frame animations to start
- Useful libraries: Paser.io, Impact.js, Pixi.js, Three.js
Make Art Not Apps - John Brown
- Make something without even knowing what you're making.
-
The TUIO Jam
- Glitch a .jpg - just create/change/delete its characters in a text editor
- Tweet a picture to
- plin.co: A Plinko-style game board with sensors and projected visualizations. Mind blown.
- Iannis Xenakis - Mathematical Music
- Frieder Nake - Walk Through Raster
- Visualization plugins: p5.js, three.js
-
Duet - Party Tetrahedrons
- Homework:
Open Sourcing Mental Illness - Ed Finkler
- The disease burden of mental illness is huge to many people, but we don't talk about it.
- "What I know" vs. "What I believe internally". You can't give another person your experience.
-
http://www.mentalhealthfirstaid.org/
-
http://osmihelp.org/: Mental health resources and articles for the developer community
-
We cannot stay silent.
Build Your Own #bada55 NodeJS Development Environment - Derick Bailey
- Some people will not code .NET without Intellisense. Does this lead to auto-correct-driven code?
- Nodemon: A file watcher for Node - pickups up router changes and restarts server.
- Configure to watch only apps, routes and libs
- Ignore CSS, ect
- Grunt: Generalized task execution
- + LiveReload = Avoid the save-refresh dance
- Then hook up some tests w/ Jasmine
node debug $(which grunt)- debug in the REPL
- Project and grunt files also at GitHub
- You are not your IDE either
Growing Up JavaScript (Closing Keynote) - Jason Orendorff
- "Every email you received was written by a person" on baby internet.
- Failure is 99% of programming.
-
Open source projects thrive on quality bug reports.
-
You can hurt people on-line now, and they hurt in real life.
-
Part of being an adult is cleaning up messes that aren't your fault.
There were other talks that I wasn't able to go to, which I heard were really good. Fortunately, , so I can check them out when I have time:
More blogs about nodebots:
-
Internet of Things "Hack and Tell" Review. — 7.2.2014
 I've been fiddling around with my - an all-in-one prototyping board with an embedded Leonardo and a fair selection of components. I'd already got it working with Node and Johnny-Five. Next I wanted to do something which demonstrated interaction between the software and some real-world conditions.

 Way back in May of 2015, I attended JSConf US to help with
